Saturday, May 5, 2012

Screen printing using the stencil method

Using a stencil for screen printing seems like an easy way to transition from stenciling to screen printing. This stencil process works best with one color and a design with no islands. There are kits available from Speedball with all of the supplies included in one box, or you can go on your own and get the following supplies to screen print your stencil.
  • Screen - Use a screen with a higher thread count for more detailed work. Screens come in different sizes. Pick one that works for you. These are re-usable.
  • Squeegee - A flat piece of plastic to spread the paint over the screen and push it through the screen.
  • Paint - For T-Shirts, you'll want to use fabric paint. If you're going to be using other media, you'll want acrylic paint.
One side of the screen is flush with the frame and the other side is recessed. Take your stencil and place it on the flush side of your screen. This is the side that will make contact with the shirt. The design should be placed on the screen so the end design is printed with the desired orientation. Tape around the edges with blue painter's tape to keep the stencil attached to the screen and only the design can be seen through. If you don't have a table set-up with hinge clamps, you'll be placing your screen down on the shirt. Put a piece of cardboard or plywood inside the shirt to stop the ink from bleeding through to the back of the shirt.

Put a generous amount of ink on the recessed side of the screen and use the squeegee and slide it across the design. Depending on your design, you may need to do this a several times to get a good transfer.

Peel the screen up from the shirt, being careful not to smudge the shirt. Hold onto the cardboard inside it to keep it flat as the screen is pulled up. Lay the shirt out flat to dry. You can hang it up to dry, but be careful it doesn't fold on itself and smudge. You can also use a heat gun or hairdryer to speed the drying time.

If you're doing multiple shirts, a hinge clamp table makes it a lot easier. When they're dry, wash the shirts.

Spoon up any extra ink from the screen and put it back in the jar for later use. Clean your screen and acetate with water. There are some mild soaps you can use as well. Spray out the screen so no ink is left in it to dry out and clog up your screen. You can reuse the screen with a different design.

Friday, March 2, 2012

Multi layer stencils

Multi-layered stencils take a bit more work, but the results are a much nicer looking image than a one color stencil. Here's one method for creating them.

First you start out like any other stencil.  You need a picture.  Paste it into a new image.  I try to keep mine 8.5 x 11 and at 300 dpi.  Custom sizes and lower resolutions should work fine too though.

Grayscale
Next you take the picture and make it black and white (grayscale).

Cleaned up background

Higher contrast image
Now adjust the brightness down and the contrast up.  You want to try and get a good balance of black, white, and grey at this stage.  You might want to go in and erase the background around your subject first.
Gaussian blur

The next step is to apply a blur.  Depending on your resolution, you'll want to adjust this up or down.  For 300 dpi, I apply a gaussian blur between 4 and 10 depending on what I'm working on.

Posterized (Black Layer)

Grey
Now, you need to posterize your image.  Make sure all of the colors are linked and set it to 2, 3, 4, or 5 (or more if you're so inclined).  You now have your basic stencil design.  Congratulations!  For this example, I will be using 3 colors.

This isn't going to be what we cut out and print though.  Duplicate your layer, this will be your Black layer.

To create the next layer, duplicate your Black layer and then select the black in your image.  Delete it.  This is now going to be your Grey layer.

White layer (and Black2)

Duplicate the Grey layer, select the dark grey color in your image.  Delete it.  This is now going to be your White layer.


Missing details?

Now you may have remaining details that you want in your stencil.  You'll need an additional black, and possibly an additional grey and white layer.  In my example I only need an extra black layer.  These extra layers need to be separate to be in our final stencil.  You will want to remove them in the white layer, since we are breaking them out separate we won't need them there.

Working with layers might be easier for you if you create an extra background layer and color it blue, green, or pink.  Just choose some light color different than the layers you are working on.  Also, if you're planning to use color in your stencil, you're going to have to create separate layers for each of those colors.  For example if your grey layer has two shapes that you want to be different colors, just duplicate the layer and then delete the parts from each that aren't going to be the other color.  If you're just using black/white/grey paint in your stencil like our example, you won't have to worry about that.

Black (filled)
Now you need to go through each layer and look for any islands.  No need to connect them with this process, but you will need to create another layer with your island and it will go on top of the layer surrounding it.  Pay attention to what order the layers will need to be applied.  These are your additional layers beyond the base layers (three in our example.)

Grey (filled)
Once you've identified how many actual layers you're going to need to do and separated them out, it's time to fill in your base layers.  By filling them in, you eliminate the need to cut intricate details on each layer as well as allow for overlap so there aren't any gaps if you don't line it up exactly when you go to paint.  Depending on how many layers you're doing, this will save you some time.  This isn't really an option for the final layers where we're focusing more on detail.  If you want to just do each color without any overlap, you can do it that way as well but it will take more time and require you to line up each layer accurately.


Black2
White (minus Black2)
Starting with the black layer, select the negative space (background).  Then invert your selection and use the eyedropper to select the black color.  Fill your selection with black.  Then select the Dark Grey layer and go through the same steps.  Select the negative space with the wand, invert your selection, use the eyedropper to grab the grey, and fill your selection.  Repeat this for each of your base layers.  In our example, we're only doing this on the first two layers.  For the white layer, we're going to remove the extra layer of black we want to lay on top of the grey and white.  Then we place it back in on the next layer.

Black
Now you have all of your layers.  In our example with three colors we ended up with four layers.  Your mileage may vary.  Go through them one by one and make sure everything looks right.  Look again for islands and look for the correct order they will be painted in.  Also look for any layers that have exact doubles of shapes.  If any of those exist, you only need to keep the one that will be the the top layer.

At this point, you can change all of the layers to black and then outline.  Print each layer individually.  You should clean up any little islands and edges at this point, making it much easier to cut.


Grey
Tape the paper to your cardboard or acetate or whatever medium you're using to cut your stencil from.  Make sure to line them all up the same.  This is going to be important when you go to paint them, you want all of them to line up with each other the right way or it isn't going to work.  Using the top and one side should be enough.  Just make sure to line up the same sides on all of them.

White
Black2
Cut them out like you would normally do.  It is a good idea to label them so you know which one is which.  When you have six stencils floating around for one picture, it can be easy to mix up which color and which order it should go in.  You might want to write on the side you will not be painting on if you are planning to use these more than once.

When you go to paint, make sure to line up the same two edges that you lined up when you cut them out.  A very important thing to keep in mind when painting is to let the paint dry in between applications.  If you lay your stencil down on wet paint, after you spray it and pull the stencil up it's going to smudge the previous layer or paint could even stick to the stencil and come off entirely.  If you just chill out between layers, you can avoid having to do a lot of touch up work or worse. Re-doing entire layers will make it an even longer process.  The more layers you have, the longer it will take to complete.

Wednesday, January 11, 2012

Mr. Brainwash

On a recent trip to Los Angeles, I was able to make it to Mr. Brainwash's 2011 art show.  If you aren't familiar with Mr. Brainwash (Thierry Guetta) I would recommend checking out the documentary "Exit Through the Gift Shop."

The show over all was cool and interesting.  Best of all, it was free admisison, he gave away free posters, and I actually got to meet him.

Here are a few photos I took at the show.


Tuesday, December 27, 2011

Painting

Painting your stencil is the final step.  You've done all the work to create your stencil and now it's time to put it somewhere for display.  Depending on your project, there are a couple of different application methods and an unlimited amount of surfaces for you to paint.  Generally, your surface needs to be generally smooth or your stencil is not going to turn out how you want it.

If you're painting your walls in your house with decorative stencils or quotes, you'll want to use a small paint roller (like a 3 inch trim roller) and a bucket of paint in a tray.  Using spray paint in your house or apartment is not something I would advise.

If you're working with canvas, cardboard, concrete, metal, wood, etc; you'll want to take it outside or in a well ventilated garage (or art studio) and use spray paint.  If you're outside, pay attention to the wind and get your can closer if there's a breeze.

Cover your mouth and nose and wear rubber gloves.  You might get some paint on your arms.

Mount your stencils to the surface being painted with a light mist of spray adhesive. Don't spray too much glue on it.  If you're doing multiple layers, I would advise not using adhesive after the first layer.

Use flat spray paint, don't use glossy spray paint.  Don’t let wet paint dry up on the stencil, you can lay it on some newspaper and wipe it off with a paper towel.  Be careful not to tear it.  One thing you can do is put one hand down on the stencil and peel it off with the other hand, being careful not to let the stencil slide and smudge your design. The best paint to buy is Montana Gold, but any rattle can of Krylon or Rustoleum will work as well.

If you’re doing multiple layers let each color dry before you start on the next one, otherwise you're going to smudge the wet layer. Depending on conditions, this could take 20 minutes or it could take an hour or longer.  It's important not to get impatient or you will wreck your picture and possibly have to re-do the entire design.  Find something to do while you wait for it to dry.  Each layer will take a bit longer because the paint underneath it will become wet as the layer on top of it is applied.

In general, I think it's better to underspray your designs.  Too much overspray or getting too thick with your spray paint doesn't look very good in my opinion.  You might have a different opinion and you're entitled to it.


Thursday, December 22, 2011

Copyright

I'm no lawyer, nor am I a copyright lawyer. That said, I am in no way qualified to give legal advice, but this topic is something that should at least be touched on.

If you are planning to sell a stencil or a painting made from a stencil you've made, make sure you have the rights to use the picture you made your stencil from.  Even selling a drawing based on a photograph which you do not have rights to use can get you into hot water if it's not in the public domain.  Even if a photograph is in the public domain, if it has an identifiable person in it you need to get permission.  There are publicity and privacy rights that are separate from copyright.

There are a few websites out there with good information regarding copyright and public domain works.  Public domain sherpa is a good one I suggest you look at.


Sunday, November 27, 2011

Going Big


Lining up islands
When it comes to most things, bigger is often better. A big billboard is way more visible to more people from further away. So why not go big with your stencil?

Print your outline out and fit it to 1x2, 2x1, or 2x2 pages (or bigger if you're so inclined.)  You will need to pay special attention to any islands that spill over from one page to another.  Unless you're leaving a margin on each page, you'll want to line edges of the outline up to the end of the acetate.  If you're going 2x2 you can do this for two sides on each.  Any larger and you're going to have to do some trimming so all four edges are at the edge of the sheet.

If you're using 8.5" x 11" size acetate and cardboard, you will probably want to tape them together.  You may want to cut each page to line up your image, taping on both sides and overlapping pages where necessary.

Another option would be to leave a gap between each page of about a quarter inch and tape both sides so it's easier to fold it up, but be aware your end product will have gaps in the shape of a grid.  This option may not work if your islands do not line up.

Or you don't have to tape them together at all.  When you use the adhesive to put them on the surface, just line them up when you paint.  This could get a little tricky and they may not line up perfectly.
Taped stencil

Wednesday, October 5, 2011

Pumpkin Carving

If you want, you can use a stencil to create a wicked jack-o-lantern and be the envy of all your neighbors.  There are a lot of free ones online you can download and print out, or you can create your own outline and print it out.  If you're only cutting halfway through the pumpkin shell, you don't have to worry about islands in your stencil.

After you've cut out the lid of the pumpkin and removed all of the insides, you're ready to apply your design.  Make sure to wash off the outside of the pumpkin.  Instead of using acetate and cardboard, you can simply tape your outline paper to the smoothest side of the pumpkin.  You might need to cut some slits so it will lay flat.  Using a pushpin, poke holes along the lines until you've poked the entire design into the pumpkin.  Another option is to use transfer paper or carbon copy paper under your outline and trace it with a pen or pencil.

Using a carving saw, cut along the lines on the pumpkin.  If you can't see your poke holes, make sure you're working under bright enough light, or try rubbing flour on the outside of the pumpkin.  Just like cutting a stencil, you should start by carving the smallest pieces first and save the largest areas for last.  Removing large areas will make your surface unstable.  Since we are working with a pumpkin, you should leave the pieces you've cut out in place until you are complete.

If you accidentally break off a part of the design you can't tape it like a stencil, but you can try using a toothpick or glue to attach it.  When you're all done, rinse the pumpkin in the sink or hose it off.  This thing needs to stay moist if it's going to last.  Another thing to do is to apply vaseline to the edges that you cut.  This will seal in moisture so your design doesn't shrivel up in a day or two.  You can also keep it in the fridge if you have room, or cover it with a towel or plastic wrap to keep it moist.  If it dries out, you can soak it in a bucket and it will come back to it's original shape.  Eventually, your pumpkin is going to get moldy and need to be thrown away.  Spraying the inside with a 50/50 mix of water and bleach will help keep mold from forming.


Monday, September 12, 2011

General Thoughts About Graffiti

Graffiti has existed since ancient times.  The earliest forms of graffiti date back to 30,000 BCE in the form of prehistoric cave paintings and pictographs using tools such as animal bones and pigments.  The images drawn on the walls showed scenes of animal wildlife and hunting expeditions in most circumstances.  They also made pictures using their hands as the stencil.  The ancient Romans carved graffiti.  World War 2 soldiers spread the killroy meme with graffiti. Contemporary graffiti has been seen on railroad cars and subways for many years. 

Allow me to share some advice from a couple sources regarding contemporary graffiti in general.


From Shepard Fairey (http://obeygiant.com/warning):
Please use common sense and consideration when applying stickers or other propaganda materials. Giant is designed to provoke thought about the mechanics of the system we live in…not to destroy it. Everyone has to live here. Plus there are extreme individuals who wish to label all street artist as vandals and push for harsher and harsher penalties and prosecution. These people are very organized and lobby for public support. To counteract their attempts to vilify street artist, the street artist community needs to befriend local arts councils, graphic arts organizations, and anyone and everyone with political power who could be sympathetic to artists who have no sanctioned public venue to express themselves. The cities build tennis courts, basketball courts, football fields, even skate parks at millions of dollars cost to the tax payer. Where are the public mural walls? It’s all about control of the public space. If the opponents of street art are the only ones who speak out then they will be the only ones who are listened to. We need to fight fire with fire and express ourselves intelligently. If we don’t come across as a bunch of vandals we may find that the silent majority is actually supportive of public artistic expression.

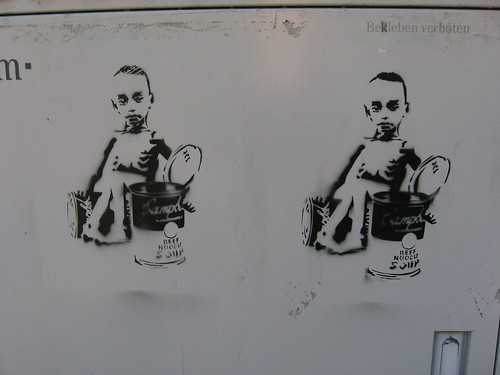
Stencil art in Berlin

The following is via artcrimes and from stencilrevolution.com - Attributed to "Mark Surface":

SO YOU WANT TO WRITE ON WALLS?
There are a few things you must do to make your presence in this subculture a welcome one. First; Know the history. Second; Know the rules of the game. Third; work hard at being good, or at least competent. Fourth; snitches and **** talkers get stitches and need walkers. Fifth; you're good, but not that good. Keep your fat head to a reasonable swell and get back to work. These are the five fingers to your left hand, get to know them well. Soon you'll be able to get a grip on your self-esteem and we'll all be better for it.


FIRST : INDUSTRY
Cavemen drew pictures on walls, but Egyptians were the first language artists, then Romans bit the steez. The Greeks, Incans, and Native Americans all got with the program. There was graffiti on the New York subway a year after it was built. There is graffiti on the moon. If graffiti is vandalism, and vandalism is a form of pollution, then man has left his mark with garbage at the fullest reaches of the universe. So you with your pathetic desire to be remembered are in good company. It's important to know how graff developed in your area code, so consult local experts, and remember, everybody lies.


SECOND; THE RULES
1) You suck until further notice
2) It's gonna take a long time before we even acknowledge your existence, even longer before we can bear to look at that foul scribble you call your name. To speed the process of acceptance, you can:
A - Choose a clever name that defies the norm of simple-minded slang. An example of a good name is "ARGUE" (RIP). It looks good when written, sounds cool when spoken, and conveys a combative attitude. On the other hand "ENEMA" (actual name) looks, sounds, and conveys a **** attitude. BE CHOOSY.
B - Use paint, gain a thorough knowledge of supplies, remember that permission walls, stickers, and dust tags are small parts of a balanced diet, be bold, learn a style of writing for every occasion, and write your name bigger every time you go out.
3) Jealousy is a disease for the weak
4) Your heart is your greatest possession, don't let it get taken from you.
5) Don't write on houses of worship, people's houses in general, other writers names, and tombstones. Writing on memorial walls and cars is beef beyond belief. Furthermore, involving civilians in your beef is grounds for dismissal. These are the five fingers to your right hand. Get to know them well. Give them soul claps, firm handshakes, and throw smooth bolo punches


THIRD; DEVELOPING STYLE
Although being a toy seems undesirable, you should enjoy it while you can. At this stage you can bite all you want with no remorse. All your elders will say is, "Awww isn't that cute, kootchie kootchie koo." So steal that dope connection, rob that color scheme, and loot whole letterforms. Don't worry about giving any credit, we'll pat ourselves on the back and brag how we influenced the next generation. However, style isn't a crutch or schtick. It is understanding why that connection you bit flows, or why that color scheme bumps. Style is the process to an appealing end. Once you got it down to a science, you can reinvent letterforms to suit yourself. This creative growth will amaze the old and young alike. Pretty soon somebody will steal your secret sauce and the cycle will be renewed. If this happens to you, don't **** about not getting your due.

Graffiti is the language of the ignored. If your style is stolen, someone heard you speaking. You got what you wanted from the beginning, some attention, you big baby.


FOURTH: THE LAW
It must be noted that the vandal squad loves graffiti. Their job requires them to fiend for graff as much as you do. When you wreck enough walls, they'll want to meet you. Just like the ball huggers outside the graff shop, they'll recite every spot you hit, with the difference being you'll also hear the Miranda warning. To postpone this, go solo as much as possible. Don't write with anyone that won't fight for you. Don't be paranoid, but be careful. If you avoid writing on pristine properties, you'll stay in misdemeanor territory, and you won't divert the cops attention from pastry and caffeine consumption (consult local laws to be sure). Remember, if they didn't see you do it, it's almost impossible for them to win a conviction without your damming testimony. Shut up, shut up, SHUT UP! Giving a cop info on another writer will doom you to a life of ridicule, from cops and kids alike, with no parole.


FIFTH: EGO TRIPPIN
There's nothing wrong with knowing you're the **** as long as you are. But once you reach that conclusion, you're one foot over the edge of falling off. Watch your step fathead, there's no shortage of people chanting, "JUMP JUMP JUMP!" There are plenty of writers that have been painting for well over 20 years, and your posing and fronting looks retarded next to them. Get back to work you "never was" slouch.
In conclusion, graffiti is free, impresses the girls, is heroic in our coach potato culture, will provide you with a million stories to tell at parties, and a sure cure for the inner city blues. If it's not fun, you're doing it wrong or have been doing it too long. So get going, fame awaits the fly amongst you.
 - Mark Surface


Monday, September 5, 2011

Cutting

So you've got your outline printed and your ready to cut? Cool. Tape your printout to a sheet of acetate. You want to be able to see your outline through the acetate. 

Using the #2 Xacto, start slowly cutting out your stencil tracing the lines of your outline.  Be careful here not to let the paper slide around under the acetate.  For the more intricate parts, use the #4 and push it straight down instead of using a slicing motion.  You should start by cutting the smallest pieces first and save the largest areas for last, or do the larger areas in smaller segments.  Having big holes will make it easier to tear the stencil.  If you tear your acetate while cutting, you might be able to save it using some tape. Depending on how complex your stencil is, this could take some time.  It's up to you how exact you want to be with following your outline.  You may want to smooth some parts of it out while you're cutting.  This is the longest part of the process and if you mess up bad, you have to start all over, so take it slow.


Now hopefully your acetate is thicker than mine and isn't .003 or .005 thick. If it is, you're going to be cutting your stencil out twice.  Thin acetate like .003 tears easily.  It's easier to cut, easier to accidentally tear, and when paint dries on it the stencil curls up and it can't be used again.  I'll be using cardboard from file folders to make my stencil re-usable.  Lay your stencil on the cardboard and using a pencil, trace everywhere you've cut.  When you're done you should have an outline of your stencil again.  Put the acetate stencil away somewhere.  You'll want to save this as a template.  Make sure not to tear it.

Cardboard cuts a little differently than the acetate does.  Be careful not to rip it here either, especially if you have narrow bridges.  This is going to be the stencil you paint with.


Tuesday, August 30, 2011

Getting Up

This may sound funny, but my first real interest in street art came from a video game.  Marc Eckō's Getting Up: Contents Under Pressure was released in 2006 for the PS2 and put you in the shoes of a young kid in a future dystopian society protesting a fascist government and gaining notoriety among other street artists.

This game was largely overlooked by the gaming community, probably because the play control was pretty clunky and it was released for PS2 right around the time the PS3 came out.  All that aside, the urban exploring sub-culture aspect and a killer soundtrack made this game a hit in my book.  Not to mention cameo appearances from real life graffiti legends.

Friday, August 26, 2011

Design

This is the most important part of a stencil. It's the creative step where your art is made. It's my favorite part of the process.
First you need a subject. A word, phrase, object, animal, person, message. This is where it's unique to you and probably the reason you're making a stencil and not buying one.

If you don't have photoshop, you're going to want some free photo editing software.  Paint.NET is what I'll be using.  GIMP works great as well. If you're a mac user, I'm still looking for a good free utility. GIMP can run on mac, but I've been looking for something native to Mac OS. So far, the one I'm using is less than stellar.

Once you have your photo software running, open up your picture with it and resize it so it is at least 8 inches wide.  We're okay with pixellated images, we're going to be editing and smoothing it out anyway.  For this example, we're doing a one layer stencil.
Original greyscale image

First turn your photo into black and white.  If the subject in your picture has a dark background, it's a good idea to crop some of that out at this stage.  You can leave some of it around your subject or not. 
Cropping out dark background

The next step is to adjust the contrast and brightness settings.  The contrast needs to go to 100.  We want a straight up black and white image here.  The brightness needs to be adjusted to your taste.  Play around with it a bit to find the level of detail you want.  You may want to adjust different areas of the  If you are just doing text, this isn't an issue.
100% Contrast and variable brightness

Once you have the stencil looking generally how you want it, we have to look at creating bridges and islands.  Look at all of the areas where you have white completely surrounded by black.  These are the islands.  You'll either need to create bridges to them, or black them out.  Creating obvious bridges looks bad in my opinion.  If you can, try to blend them into the design.  The design also should not be touching the edges.  You should also take some time here to clean it up and sharpen up any details if you so desire.
Cleaned up background
Sharpened up mouth and removed any islands

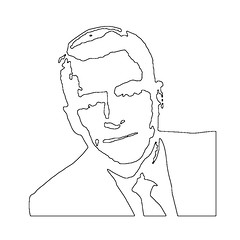
Once you have your complete stencil looking how you want it, turn it into an outline and print it out.
Outline for printing